
After 15 years of Corrado ownership I finally moved on to other pursuits, and while going through all my documents and files I realized I'd collected quite a massive amount of information that the new owner would probably be very interested in having access to. Below is a dump of all the info I collected about my Corrado and some notes about the repairs and upgrades I performed over the years. I hope it's useful to future owners.
========================================
Skye's Volkswagen 1990 Corrado G60 Notes
[___][_]===\X/===[_][___]
========================================
VIN WVWDB4504LK004542
http://www.angelfire.com/or2/machtiggti/vin.html
Pearl Effect Blue LC5Z
Built Oct 4, 1989 Sold Mar 20, 1990 Puyallup WA
Corrado Production: 97,000 total, about 45,000 to the US.
Vancouver:
Alpi's European Auto Parts
http://www.alpiseuropean.com/
Seattle:
Carter VW 206.782.7474 M-T:8-6 Sa:9-5
German Auto Clinic - 5220 14th Nw Seattle, WA 98107-3729
206.782.1918
Import Doctors - 211 Bell St Seattle, Washington 98121
206.728.2212
Hans Foreign Car Repair - 6302 35th Sw Seattle, WA 98126-3004
206.932.5552
Group 2 Inc. - 4442 27th Ave W. - Seattle, WA 98199-1220
206.378.0900 M-F:8-6
Foster's Wheel Service - 4012 Leary Way NW Seattle WA 98107-3736
206.789.5353
AUTO SPORT IMPORTS 19611 Pacific Hwy. South Seattle, WA 98188
Tel:(206) 878-5230
Fax:(206) 878-1527
1stVWParts.com Puyallup/Auburn
New/OEM:
http://www.oemepc.com/vw
http://www.vwpartsdepartment.com/ catalog search by VW part #
http://www.dieselgeek.com/
http://www.impexfap.com/partsearch.cfm?model=5&category=0&subcategory=0
(vwparts.com)
http://www.germanautoparts.com/main.php?make=Volkswagen
http://www.thepartsbin.com
http://parts4vws.com
Used:
Absolute German (206) 782-6410 Sa:9-6
9510 14th Ave S SEATTLE, WA
Campbell-Nelson Auto Recyclers (888) 337-7757 www.findusedparts.com
18021 59th Avenue NE Arlington, Washington 98223
M-F:8:30-5 Sa:9-4
Upgrades:
http://www.bahnbrenner.com/
http://www.eurosportacc.com/
Factory tools:
http://www.zelenda.com
----------------------------------------
Online Resources
----------------------------------------
VWVortex Corrado Forum
https://forums.vwvortex.com/forumdisplay.php?8-Corrado
VWVortex Corrado Classifieds
https://forums.vwvortex.com/forumdisplay.php?5099-Corrado-Classifieds
CorradoWorld Forums & Classifieds
https://www.corradoworld.com/
http://www.corrado-forum.net (dead)
----------------------------------------
3pt (manual seat belt conversion
----------------------------------------
Yup, you can convert to a uk/europe seatbelt system you need the complete
seatbelts, clamps, the bar on the floor which the seatbelt loops through
and the height adjustable mount which bolts onto the B pillar, you would
also need to swap the trim pieces for one from a European car (A&B
Pillar) However all parts are easy to ship except for the A pillar trim
as they are really long! - Majik, N. London
...
If you are a regular on VWVortex, you can find those from at least two
suppliers, Neils and Corrado Fiend.
They are typically only available in black, which suited me fine since I
was doing a black conversion anyway.
If you decide not to go that route, and determine that you have faulty
automatic seatbelt parts - let me know, as I've got leftovers from my
conversion you may be interested in.
Cheers,
Thomas Woody
bunglemutt@mindspring.com
CCA Member #871
...
neils @ vwvortex - complete conv kit 325usd shipped
majik @ c-forums - conv W/O console & A-pillar trim £150 shipped (~250usd)
...
Removing seats:
Take the e-brake handle off, take the top half of the center console
around the e-brake off, take both side track covers off from the back,
take the allen bolt out of the center track from the front, then slide
the seat all the way backwards and lift out.
Okay, now I can't get the e-brake cover off, I took that one screw off
that is under the handle, it moves freely, but the cover over the actual
lever keeps it from sliding off....
Right where your pinky would be there is a clip, squeeze it hard and
slide it forward.
----------------------------------------
Moonroof Conversion
----------------------------------------
Complete fully functional moonroof assembly, includes sliding sunscreen.
Will fit any year Corrado. $250 plus shipping. I also have a Passat
assembly available IM or Email for more info - Karrambo
A3 Jetta - 93-98
Passat moonroof from year 95.5-97 have the clips that dont break (B4)
B3 Passat - 1990-94
B4 Passat - 1995-97
B5 Passat - 1998-? * DOES NOT FIT RIGHT
----------------------------------------
Door handles & locks
----------------------------------------
Broken door handles -
this is perhaps the most posted about problem. It would seem that the
best way to go about it is to get a passat rear door handle. This doesn't
have a lock, so be sure the central locking works well! Mmm, do you have
passats in states? If not, I'm sure you could ask someone here to post a
pair across. Anyway, check posts in this section, theres loads of info
on this one... - Paul, Belfast
http://www.corradog60.de/drive.cgi?to=TechTips_Outside_Tuergriff_(001)
B3 passat, rear handles.
...
My friend had this problem on his DS door. He bought a new handle from
the dealer the first time and then less then a year later it broke again.
The dealer covered the handle under warrenty but the head tech there
mention to him that the problem was not the door handle but rather the
latching mechanism on the door. The tech said to take the gold anodised
latch box off the door while replacing the door handle and to clean it
out with something like carb cleaner and an air nozzle and then to
regrease it. My friend did this without completely removing the latch
mechanism from the door(the wires or linkage were still connected but it
was pulled away from the door) 3 years later my friend has not broken any
more door handles. I did this after breaking my door handle 2 years ago
and haven't had any problems either.
But the reason why the door handles break is because of the grit build up
in the latch. The grit increases the friction to a point beyond where the
handle is strong enough to pull without breaking. clean the grit out and
grease the parts back up. and all should be good
- G60ING, Moyock NC
...
Yes, that's definitely possible. If you still have the serial number tag
that came with your car when it was new, any dealer should be able to get
you matching tumblers from that number. Or, they should be able to match
any tumbler that you hand/show them. Even if they can't match it, you
can re-key a tumbler by replacing/rearranging the sliders in the tumbler.
-Nate
Depends on how nice your dealer's parts guy is. Some will sell (or give
freely) individual sliders, others will only want to sell you a big huge
bulk pack of them.
-Nate
...
Open up the one that you want if you dont have the code and the sliders
will each have a number. Then mimic as close as you can on the passenger
side. or go buy more sliders from the dealership. -SLCorrado
----------------------------------------
Wheels & Tires
----------------------------------------
(tirerack.com)
OE size 195/50-15 576mm
or.. 195/55-15 596mm +3.4% * GD Alpin
195/60-15 615mm +6.8%
185/65-15 622mm +7.9% * GD Inari
205/60-15 627mm +8.9%
+1 size 205/45-16 590.9mm +2.52% * yoko avs es100
+2 size 205/40-17 595.8mm +3.32%
http://www.miata.net/garage/tirecalc.html
Get: Yokohama AVS ES100 - Size 205/45WR16 ??
tirerack.com $78/ea + $35 ship = $346
discounttire.com: $99/ea = $400
Winter: Dunlop Graspic DS-1 195/50-15
Bridgestone Blizzak WS-50 ** best
Michelin Arctic-Alpin ** not good in deep snow?
http://www.tirerack.com/tires/tests/studless_2002.jsp
or .. http://www.nokiantires.com/newsite/tires_popup.cfm?id=25
Hakkapeliitta Q vs 1 vs 2 ???
Nokian Dealers:
Phelp's Tire Factory
2520 Airport Way South
Seattle , Washington 98134
Phone: 206-622-8977
Hakkapeliitta Q: $96.30 + tax
Hakkapeliitta 1: $101 + tax
Mount/Balance: $10
South Park Tire Factory
8510 Dallas Avenue South
Seattle, Washington 98108
Phone: 206-762-2610
or .. www.greendiamondna.com ??
tire life?
On Miata rims:
This auction is a set of 14"x5.5 MAZDA MIATA wheels & tires. This
alum. wheels have 4/100 bolt pattern size. The tires are
185-60-14
or...
1988 BMW 325e 14" spare tire. In perfect condition. Rim size is
14 x 5-1/2", 4 lug, 100mm. Will fit 84-88 325e, 84-85 & 91 318i,
and 87-91 325i. ST# 021148.
"bottlecap" wheels??
http://www.2002parts.com/html/4-lug_wheels.html
E30 "bottlecap" wheels 14x5.5 ET35
http://www.bmwpugetsound.com/vbb/index.php?s=
*** NO *** 14" too small to clear brake calipers ***
...
http://www.corrado-club.com/corrado/faq/wheel-tire.html
Corrado G60 4x100 pcd
7x15 ET20-43
7.5x16 ET20-37
7.5x17 ET20-30
Corrado VR6 5x100 pcd
7x15 ET?-33
7.5x16 ET?-35
7.5x17 ET?-35
8x17 ET?-35
Above data was derived from the D&W aftermarket German catalog.
All Corrados: Hub-centric, Bore 57.10mm
...
Miata 4x100 hubcentric bore 54.10mm
Dodge Neon (all) 1995-1997 (4x100mm / 12x1.5 Lug-nut / 57.10mm Bore)
McGard wheel locks 28175
RX2 24 lbs 17X8
----------------------------------------
Clogged exhaust problems
----------------------------------------
Cat tests -
1. THE THUMP TEST
Thump the converter with your fist. If it is a monolith type and you
hear pieces moving around inside the converter chances are the
substrate has come apart.
2. THE TEMPERATURE TEST:
For this test you will need a digital pyrometer. To commence testing,
run the vehicle at a high rpm for two minutes (about 2,000 rpm). This
needs to be done to ensure that the converter has had time to
activate. Touch the probe of the pyrometer to the front of the
converter and note temperature. Touch the probe to the rear of the
converter and note temperature. There should be a noticeable
difference between the two temperatures, with the rear temperature
being hotter. If the rear is not hotter than the front, the converter
is not working properly.
3. THE BACK PRESSURE TEST:
This test will require a back-pressure gauge. An inexpensive
back-pressure gauge can be made from a small pressure gauge that reads
from 0 to 30 psi, a piece of vacuum tubing and a small 3 mm O.D. piece
of copper tubing with a 3mm I.D. viton O-ring. This O-ring will help
to seal the hole that the copper tube is inserted into, or a
back-pressure gauge may be purchased from numerous sources pre-made.
The exhaust pipe at the front of each converter. With the engine
running, check the back pressure. The back pressure should be no more
than 4 to 5 psi. This reading is with the throttle partly open at 2500
rpm. When checking exhaust back pressure, be sure to check at the
inlet and outlet of each converter or exhaust component tested. A
reading of 1/2 to 2 psi is normal.
4. EXHAUST GAS ANALYSER TEST:
A gas analyser will tell you if the converter is functioning properly.
By checking your CO (carbon monoxide) reading, you will also be able
to tell if the system is operating rich. Hooking up the machine
differs according to the model and brand of analyser being used.
Consult the analyser manual for instructions. Once you have determined
that the converter has failed, the next step should be to find out why
it failed.
----------------------------------------
Interior & Sound System
----------------------------------------
http://www.corrado-club.com/aktiv/index.cfm
dash: 4" euro fit (regular OK with some mods)
door: 4" in AKTIV amp, or 5-1/4" regular
rear deck: 4x6" euro fit
Blaupunkt PCxt462 4"x6" 2-way Speakers 2-35 watts RMS
Blaupunkt PCxi542 Injected Series 5-1/4" Speakers 2-40 watts RMS
Blaupunkt PCxt402 T-Line 4" Speakers 2-35 watts RMS
JVC KD-SX990 CD/MP3 Receiver with CD Changer controls
...
Powered fuba antenna:
Connect that to the power antenna wire on headunit. If it doesn't have
one, hook it up to the amp trigger wire (blue on aftermarket headunits)
...
deck lid straps: 535 863 447A
...
stock wheel: 14" leather
MOMO Evolution IV 14"
----------------------------------------
Intake and boost leaks
----------------------------------------
http://www.corrado-club.com/faq/detail_faq.CFM?FAQID=168
Buy some PVC caps (2") and cap ends (the ones with the gasket). They
should run you about $4-$6. Then go out and buy a valve stem, similar to
what is in a typical steel rim ($2). Get some gasket sealer as well ($3).
Now drill hole in one of the caps the size of the valve stem. Apply the
sealer to the hole and push the valve stem though. Apply the gasket
sealer on the threads of the cap ends and screw the caps to the cap ends.
By the time you go to the store, come back, build the kits, an hour or
more will have passed. You can now attach the cap ends to your boost
piping and pressurize the system. SEE ARTICLE FOR PRESSURE WARNINGS.
----------------------------------------
Corrado body kits
----------------------------------------
http://www.thecorrado.com/entuning.html
JE Design mesh sport grille? find pics w/o eyebrow...
There are basically 9 companies making 12 front bumpers to choose from:
1. ABD/Erebuni/Oettinger 2. Dietrich 3. Mattig
4. Rieger GTB, GTS, R-RS and GTO styles
5. Zender 6. Kamei 7. Seidl 8. Lumma 9. RS
1. The ABD/Erebuni/Oettinger are all the same made my different
companies. Oettinger made the bumper originally but has since quit,
ABD sell one ( http://www.abdracing.com ), also Erebuni sells one-
called style 846 ( http://www.groundeffects.com )
2, 3 and 4 (R-RS style) are almost identical. The major difference is in
the overall height of the bumpers and the fact that the Mattig
requires the use of MK3 turns and fogs. The lowest bumper is the
Mattig followed by the Rieger, the highest from the ground is the
Dietrich. The Dietrich and Mattig are full replacements, whereas the
Rieger is an add on to the stock bumper, Also the Rieger is made out
of ABS instead of fiberglass like the Dietrich and Mattig. The
Dietrich can be bought directly from Germany (
http://www.dietrichtuning.de ) or through distributors in the US. The
Mattig and Rieger can be bought through distributors in the US like
RPI Equipped ( http://www.rpi-equipped.com )
4. Rieger GTB, GTS and the Widebody GTO styles are all available from RPI
( http://www.rpi-equipped.com )
5. The Zender is also not made anymore but a copy can be found from
Erebuni, On there website its called style 190
6. The Kamei Freedom Design Bodykit can be bought from Rocky Mountain
Motorworks under the label Aero Kit G60 and Vr6
( http://www.motorworks.com )
7. The Siedl "Venus" bumper is made in europe by Siedl Tuning and can be
bought from their website ( http://www.seidl-tuning.de). There is a US
copy made by e-strictly foreign but all of there stuff is made very
badly so stay away from all of there stuff.
8. The Lumma Bumper. This bumper is also made in europe by Lumma Tuning.
It can be purchased from Stroeve Motorsports
( http://www.csi-auto.nl/carshopping/0512 )
9. Lastly the RS bumper, The bumper uses turn signals from A2's.
It can be purchased from TM Tuning ( http://www.tmtuning.com )
Now sideskirts, there are basically 7 companies making 10 different
sideskirts:
1. The ones that goes with the ABD/Erebuni/Oettinger kit
2. Rieger R-RS Infinity, GTB, GTS, GTO
3. Custom ones made by Zarman on Vortex
4. Zender 5. Kamei 6. Seidl 7. Lumma
1. The ABD/Erebuni/Oettinger ones can be bought from the sites previously
given
2. The Rieger sides can be bought from the previously listed site
3. Zarman's custom ones can be bought from his site
( http://www.lunchbox3.com/shop/ )
4. Zender sideskirts can be bought from the previously listed sites
5. Kamei sideskirts can be bought from the previously listed sites
6. Seidl sideskirts can be bought from the previously listed sites
7. Lumma sideskirts can be bought from the previously listed sites
Lastly Rear Aprons, There are 8 companies making 10 different bumper
options to choose from. The last option requires custom modifications to
any US spec front chin spoiler:
1. ABD/Erebuni/Oettinger 2. Dietrich, 3. Mattig
4. Rieger GTB, R-RS, GTO 5. Zender 6. Kamei 7. Seidl 8. Lumma
9. Some people use a stock chin spoiler as a rear apron
1. ABD/Erebuni/Oettinger rear bumpers can be found at the sites listed
above
2. Dietrich makes a rear bumper, the only modification is a indent for a
license plate in the bumper instead of on the hatch, again they can be
purchased at the previously listed site
3. Mattig does the same thing and Dietrich and makes a bumper with an
indent for a license plate; source as above
4. Rieger GTB, R-RS, GTO Rear bumpers source as above
5. Zender rear bumpers can be found again at the Erebuni site
6. Kamei rear bumpers can be purchased from the previously listed site
7. Seidl rear bumpers can be purchased from the previously listed site
8. Lumma rear bumpers can be purchased from the previously listed site
9. The Stock chin spoiler takes a lot of custom work; basically it
requires cutting the spoiler at the exhaust cut out, and bending the
ends to match the contour of the rear bumper. Lastly the ends need to
be cut off at the wheel well and end caps glued or plastic welded back
on Pictures for all of these kits can be found at there respective
websites. There are many other sources to purchase these bodyparts, I
only supplied one such source
- mack73
----------------------------------------
Suspension
----------------------------------------
The Corrado is an A2 chassis.
Stock ride height, 90 Corrado, center of wheel to fender lip: 14" ??
Tom's stock 93 SLC: front center fender: ~14.25", rear: ~14.5"
Mine, as bought: ??
...
H&R Sport Springs 54706
Approximate Lowering - Front 1.3" Rear 1.25"
Evo Price: $189.00
RPI Equipped - 175.00 CDN
Bilstein Sport Front Set Evo Price: $265.00
Bilstein Sports/SP are designed to push a cars suspension to its
performance peak. These dampeners are valved at least 15% or greater than
stock and feature shortened piston rod lengths and strokes
RPI http://www.rpiequipped.com
Front - V36-0214 185.00 HEAVY DUTY
REAR - B36-1417 114.00 ???
...
I disagree. IMO The best bang for the buck is Weitec. At $380 for a
complete kit (GT), you can't go wrong. Or you could opt for the TX kit
which has adjustable shocks for about $100 more. I had them (Weitec GT)
on my last corrado and had I not gotten my coilovers for free, I would
have gotten them again. They were awesome. Handles great, rode nice,
perfect drop.
...
Shine Racing http://www.srsvw.com/
Real Street Suspension Kit w/ Bilstein
4 Real Street springs, 4 Bilstein HD Shocks, and SRS Rear Sway Bar.
VW A2 Golf/Jetta/Corrado (85 - 92) $829
bump stops??
** keeps stock ride height
4 to 5x100 conversion?
Rear easy, front somewhat complicated.
http://littlespiderdesign.com/vdub/5Lug/
----------------------------------------
Exhaust systems
----------------------------------------
Most people would agree that Techtonics is the best. Either a 2.25" or
2.5" stainless steel with either one or two resonators. I personally run
a TT 2.25" stainless steel with one resonator, a borla muffler (straight
through) and a TT race down-pipe with the Cat eliminated.
- Greg, vdubin90
253.160 Catalytic Converter Direct Fit for Corrado G-60 $175.00
253.332F TT Ex. Corr. G-60 2.5 in. Alum w/ Flowmaster (two res) $340.00
Techtonics Tuning Po Box 295 Sheridan, OR 97378 503-843-2700
- gut the cat (pinch bolt to exhaust?)
- new bolts, hangers (TT internal chain)
- all gaskets... (dp to cat? etc)
BBM carries TT stuff??
...
If you want something on the quiet side go with Jetex, ND sells them.
just slightly louder then stock. excellant fit and finish. TT is nice and
a good price but it is also loud. I have 2.5 cat back with 2 resonaters
and flowmaster muffler (was told its the quietest) and its loud. Had to
change mufflers for inspection. - DougG60
JETEX exhaust: Corrado G60 stainless steel - 90mm round SS tip - 2.5"
63.5mm system $549.99
----------------------------------------
HVAC problems and upgrades
----------------------------------------
Re: Air Conditioner Works on Speeds 1 & 2 but with no fan....
This problem is typically caused by a blown series resistor for the fan
blower. It is located on the evaporator which is accessible only with the
glove box removed but otherwise an easy R&R.
The part is 20$ on VWParts.com's site (Impex) 191 959 263
...
heater cores, switches etc:
http://www.dieselgeek.com/corr_climate_control.htm
...
----------------------------------------
Deleting AC
----------------------------------------
Serp 6 rib 65"
Vbelt 26.5"
Dayco (with "cheap" pulley):
serp: 5060650 6PK1650 (6x 1650mm)
vbelt: 15260 11A0660 (9.5-10mm x 660mm)
use 15mm spacer for where power steering attaches to accesory bracket
non-AC "smooth" water pump pulley 028 121 031E
or 037 121 030A it's the non-ac syncro pg engine pulley $$$
...
I originnally started the thread and didn't get any help. But it is not
all that difficult when you just look at it.
Basically get rid of both relays on the side of the radiator and really
everthing that attaches to them. snip snip snip. ____Save them..Use the
housings and the 30A relay for relaying your lights if they're in ok
shape.
The only important wires you need to keep are the three running from the
engine compartment from the first stage fan after run relay.(these can be
found under the battery). snip the harness off. Route the ground to your
fan, the constant Power line to the power line of your fan thermoswitch
on the side of your radiator. And the other one to your fan power (low
speed). The other two wires coming out of your fan thermoswitch need to
be routed to the correct speeds of your fans power lines.(low and high)
Keep a good length of wire coming from your thermoswitch.
So you will have two power wires going to your low speed power line of
your fan, one from your thermoswitch, one from your the old harness under
battery(1st stage relay in cabin power). And one coming from your other
thermoswitch line(high temp switch) to your high speed fan power line.
If you need wire colors email me mrmacamillioni@hotmail.com.
----------------------------------------
Brakes
----------------------------------------
eurosport braided brake lines
MK2/Corrado G60 (6 line set) 861020 $109.95
...
BREMBO 4-POTS
If anyone wishes to upgrade there brakes to seat brembo 4-pots, here's a
list of the parts:
Brake disc-305mm/28mm-part no- 6KL615301 - £50 + vat each.
Caliper with pads- 6KL615123 & 6KL615124 - £86 + vat each.
Bracket for caliper to hub- 6KL615421 - £11 + vat each.
Bolts for bracket to caliper- 6KL615141 - £4.50 + vat each.
there you go no need to be taken for a ride now you can go and buy them
from vag yourselfs for very good money!!
- 8vg60
----------------------------------------
ISV reroute / check valve
----------------------------------------
http://www.bahnbrenner.com/acatalog/G60_Performance_Engine_Parts.html
BBM Price: $59.95
KK: $49
----------------------------------------
Transmission
----------------------------------------
Install VR6 shifter weights on G60?
(may require IC pipe mods)
...
the dieselgeek (or any) short shift, is the best $$$ bang for buck mod,
along with a front solid mount.
It will transform CRAP shifter to beautify solid gating. Don't forgot the
solid front mount, it makes a HUGE difference in movement of the motor. If
you think about it, motor/tranny moves, the cables/shift box don't..
...
Engine Oil: Mobil 1 15w50
or Shell Rotella T 15W40
Transmission Oil: Redline MT-90
90-92 16V Passat manual tranny mount is the best,solid rubber disk,no
"hydraulic silicone dampener" to blow out,I use it at the track,no
problem..................
_________Final______1_________2__________3________4________5
ATA______3.684_____3.778_____2.105______1.345____0.971_____0.795
__________________13.918_____7.754______4.954____3.577_____2.928
AYL______3.684_____3.778_____2.118______1.429____1.029_____0.838
__________________13.918_____7.802______5.264____3.790_____3.087
AYK______3.684_____3.778_____2.118______1.429____1.029_____0.838
__________________13.918_____7.802______5.264____3.790_____3.087
AGC______3.944____3.778______2.105______1.345___0.971_____0.795
__________________14.900_____8.302______5.304____3.829_____3.135
----------------------------------------
G60 Supercharger
----------------------------------------
switch "2", clock
MFA Readout Motometer/mbar vac/pressure
15 200 23.7 in. Hg
55 400 17.8
90 600 11.9
127 800 5.9
148 1000 0
172 1200 2.9 psi
192 1400 5.8
211 1600 8.7
228 1800 11.6 * stock ISV cutoff
242 2000 14.5
255 2200 17.4
----------------------------------------
Oil pressure/Temp sensor problems
----------------------------------------
None of this crimped hose garbage :D
And plugging is too messy! The right hoses are cheap.
Be VERY careful not to over-tighten aluminium fittings!!
Use grease on threads during fittings assembly, and hose construction.
For a tutorial on making hoses get the Pegasus Racing catalogue:
http://www.pegasusautoracing.com/pdfs/068.pdf
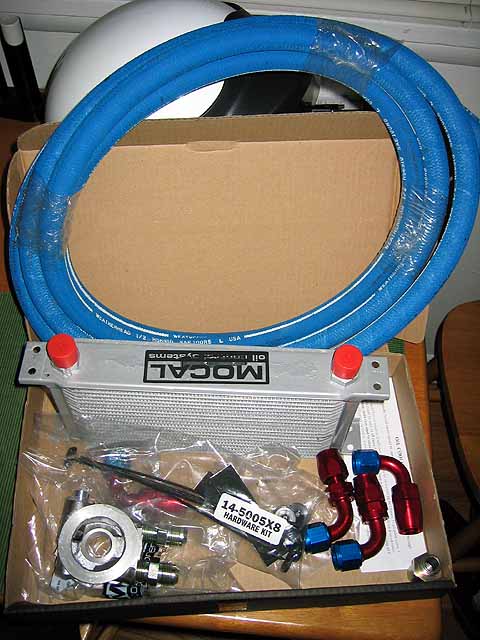
Parts list for my oil cooler setup:
1 x Mocal SP1T sandwich plate (3/4-16 thread, 180F t-stat)
1 x Mocal MOC-19210 oil cooler (13" x 19 row, AN-10 fittings)
1 x Oil cooler to radiator mounting kit
2 x 1/2" NPT male to AN-10 male fittings
4 x 90deg AN-10 reusable swivel fittings (ie Aeroquip FCM4034)
6' or more, oil cooler hose (about $5/foot, 300F 1000psi or higher) *
* I used Weatherhead nomex covered hose, but you can use other kinds.
Just make sure the 90deg reusable fittings will fit the hose!
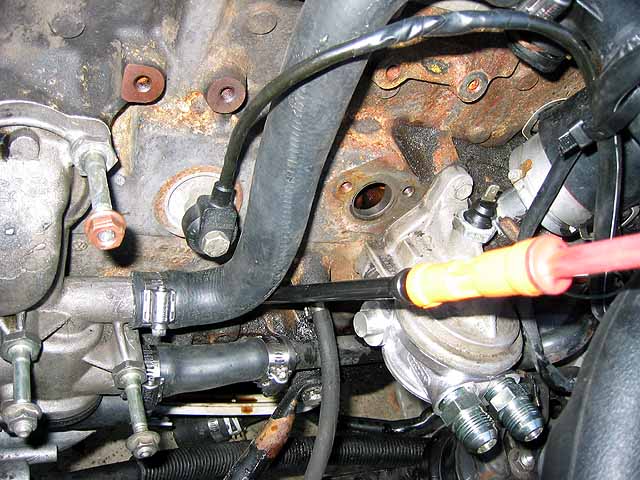
New coolant hoses, to delete stock oil heat exchanger:
1 x 026 121 053G
1 x 068 121 063M
Golf oil filter pipe stud for fitting Mocal oil sandwich plate:
1 x 059 115 721
Total cost around USD $300
Bought most of the stuff from http://www.racerpartswholesale.com/
New coolant hoses, sandwich plate installed:
Cooler installation pics:
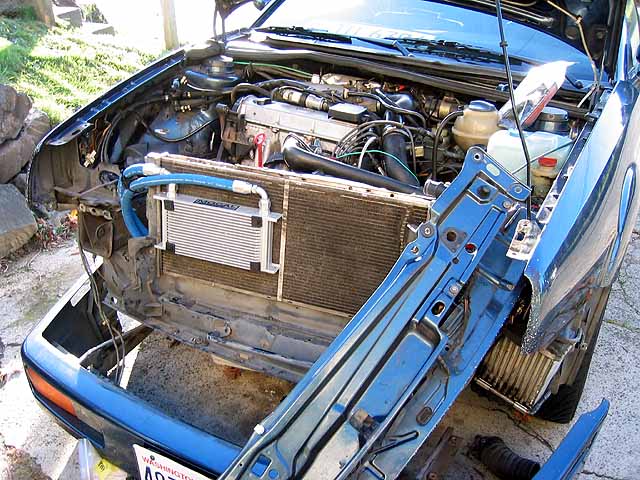
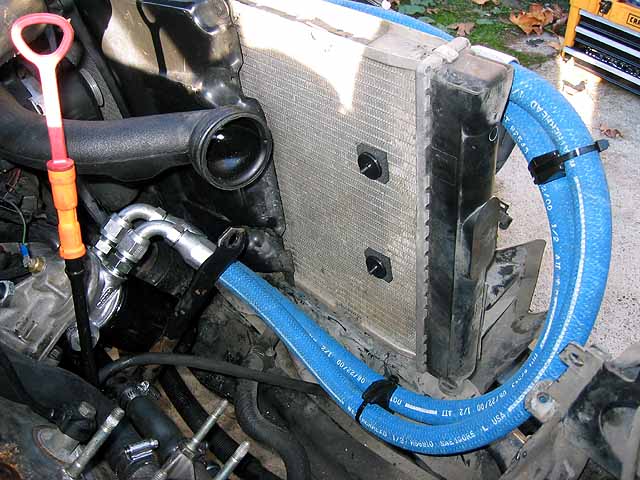
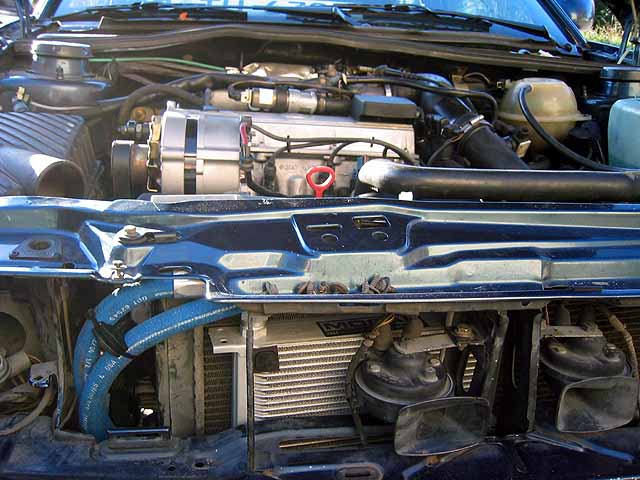
Double and triple check all routing and clearances before mounting the
oil cooler to the radiator. Note: I had to notch the back of the plastic
headlight housing slighty to clear the hoses. Also, I removed my AC
at the same time so that made things a lot easier. In fact there is no
way you could mount the cooler where I did with the AC condensor still
installed.
Skye
...
27mm socket for oil cooler (or 1-1/16") retaining nut
pipe stud thread 3/4 - 16
original: 81mm len, 12mm thread both ends
modified: 62mm len, 13mm thread one end, 29mm thread other (remove 19mm)
Volvo oil cooler and sandwich plate : pn 1276680 (*Wahler)
* need o-ring .. northern european??
Drill 37/64" (.5781) reduced shank and tap with 3/8 -18 NPT
* tacoma screw has both
4x 3/8 NPT to AN-10 adapters
4x -10 90 deg fittings - as sample Weatherhead 24710N-670
hose (nomex cover) - as sample
* Fittings Inc. - 5979 4th Ave S - 206.767.4670
oil coolers:
http://www.dieselgeek.com/oilcooler.htm factory loc, water cooled
BAT inc they charge $79 US for a sandwich adapter plate with a 170deg thermo.
http://www.autotech.com/oilsys.htm $99 180F sandwich plate
...
A 16 row 115 cooler can be mounted directly onto the slam panel in front
of the charger and behind the upper grill. The mounting bracket holes of
the mocal coolers line up exactly with two larger predrilled holes in the
slam panel.
Mount the cooler using 20mm washers at the top, benith the washers a 20mm
dia x 2mm rubber washer, slam panel, then a 20mm dia x 10mm depth rubber
washer, though cooler mounting holes, two 25mm M6 bolts though the centre
secured by two nylock nuts at the bottom. Mount the sandwich plate as
normal and run the short hose run to the cooler fittings which should
face downwards toward the cross member.
I hope all this makes sence. Mounting in this position provides easy
access, no need to remove the bumper, but you will possibly need to
remove the charger if you cannot do the fittings up with the front uper
grill removed surficently tight enough. - beavis (corrado forum)
...
The best trick I did was something I read here some place, which was to
replace the coolant lines that supply coolant to the stock oil cooler
with lines from another VW engine that doesn't have an oil cooler. The
part numbers for these two hoses are 026 121 053G and 068 121 063M. This
is much cleaner than trying to plug the hoses after cutting them.
Re: anyone running an oil cooler out of a volvo 740 T..?
The volvo thermostatic diverter bolts right up to our oil filter flange
in place of the VW sandwich plate. Use the volvo lines, plate and cooler.
Straight bolt-on. I've been running this on various A2's for years now.
...
I'm using the cooler plate from a turbo volvo. Fits perfectly, but I'm
non-ac. I've attached directions for getting one below. Hope it helps.
It was surprisingly easy. I found a 740 turbo in a wrecking yard (I was
told that all Volvo turbos use the same piece, though I can't attest to
it.)
The oil filter attaches to an aluminum extension that is on the
passenger's side of the block below the turbo. It is much easier to
remove the whole extension than the sandwich plate in situ. The extension
is bolted to the block by a VERY large nut; I'd guess 32mm, but I used a
large pair of adjustable pliers and recommend that approach. Once you
undo the bolt the rest is apparent. The oil lines (they start off metal
but become rubber below the fan at the front of the engine) are held in
place by two brackets, one right by the extension and another below the
fan. Both bolts are 10mm if I remember correctly. Undo those bolts (there
are two on the bracket below the fan) and the oil lines are free. The
cooler is bolted to the radiator, driver's side--two bolts (10mm again)
and it comes out.
Once you have the whole unit out, the sandwich plate is easily separated
from the extension by removing the retaining nut (I used needle nose
pliers.) The sandwich plate fits where our factory oil/water "cooler" is
rather nicely. The Volvo oil lines are long, so you should have plenty of
options for placement. The only warning is that I am running sans AC
there maybe a fitment problem with the compressor, but I can't address
that.
...
my oil temp survey...
VW's and Nissan SE-R
210-220 summer normal driving around town
220-240 summer highway
240-260+ track
WRX: 203 F hot day stop-go driving
"Most M3 engines run about 180-190 in day to day driving.
For auto-x and driving schools most of them run about 225 to maybe 250
on the outside for really high RPM loads for long periods of time."
"The point I was trying to make was that oil was oil. Normal operating
ranges for automobiles is 200 to 230. Many Oil tests are performed at
210. If that temperature is OK for cars, it is fine for our bikes."
...
1.8 bar (26 psi) oil pres sensor, oil filter housing (rear), yellow wire
0.3 bar (4.3 psi) oil pres sensor, head RH side (from front), grn/blk wire
oil temp sensor, oil filter housing (front), blu/blk wire
blu/whi wire N/C
ebay vdo gauges and sender 2004-06-12
sender: 035 919 561A , 1.8bar WK , 0-5bar G , 49/1 , 7 86 , M10x1
"Junkyard Make and Model: 1983 VW GTI, 1984 VW GTI, Numerous Porsche 924
model years (if you need the 10 bar sender)."
Wrecking yard, off any 1986-1992 Cabriolet.
...
at 2100rpm oil must be at 1.8bar or buzzer n light will be there. if you
foot down at this point (i know it sounds bad) and the buzzer goes off as
you rise up the range then its probly the 2 bar sensor. 2100rpm is the
telling point. I've had both sensor and oil pump fail on me. they both do
similar things. The oil pump problem kept the light on though after the
first couple of times. Get a capillary gauge and see what pressure you
get. I used a £17 TIM guage cos it was cheap. Replace the switch too
1.8bar is in top of oil filter housing I presume we ALL use VAG filter
and proper oil anyway. You should get about 35psi at 2100rpm when warm.
When its cold lots bout 60-80 psi give an idea of what the oil seals have
to handle when cold - GazzaG60
...
does the oil beep come on when the car is not fully warmed? because if
you rev the car over 3k when oil temps are low than the light and
bleeping comes on.
...
oil press light flashing/constant diffs????
----------------------------------------
Engine Coolant
----------------------------------------
Someone suggested checking for airlock in the system. I took the cap off
and ran the engine till the fan came on and the coolant level went up to
above max (cause the system wasn't pressurised) and some air did bubble
out. Put the cap back on and let it cool yesterday. Not had a chance to
give it a run yet but the coolant level worries me slightly. Thanks for
your advice guys but the radiator seems to be heating up all over ok. Is
it worth while replacing the thermostat anyway? Cheers
...
What does the water temp on the dash read now it's working? Should be
around 90deg although upto 110deg on a SERIOUS drive, or stuck in traffic
is still acceptable as long as that's the only times it goes that high
and you're certain that you've got the correct coolant and the fan works
----------------------------------------
Starter
----------------------------------------
"From my CCA post:
If (or rather when) you go to replace your starter on an early G60, you
will be asked what production you have (first or second). Most part
houses have no clue what this means.
Simply, First production = two bolt mount,
and Second production = three bolt mount.
BTW, a Jan '90 has a first production starter.
hallkbrd"
----------------------------------------
Wipers
----------------------------------------
Wiper spring measurements:
Machine hook ends, 14 coils
Overall Length: 58mm (2 1/4")
Extended Length: 72mm (2 13/16")
Outside Diameter: 11.2mm (7/16")
Max OD that will fit in the arm 14.5mm (9/16")
Wire Diameter: 2.25mm (0.089")
Initial Tension: about 20 lbs
Spring Rate: about 120 lbs/inch
1st try: McMaster-Carr 9628K11
Zinc-Plated Steel Cot Extension Spring 1-23/32" Length, 1/2" OD, .080" Wire Diameter, Packs of 6 $7.26
Other possibilities:
http://www.leespring.com/
http://www.asraymond.com/spec/
lexor extreme weather (costco)
d 20" p 18" r 18"
...........................................................
Arms and blades, quick comparison...
I tried the arm bend trick and used bosch wiper blades before, always
smearing and leaving a huge patch infront of the driver over 60mph making
it hard to see... Might as well not have wiper blades.
Lupo wipers almost like its not raining. Really worth the dosh.
The guy behind the counter told me people are doing this sort of thing
alot with golfs/passats, he hadnt dealt with anyone with a C before.
P/Ns are.:
6x2955409A ... Wiper Arm L16.50 +vat
6x2955410A ... Wiper Arm L16.50 +vat
6x2955425B ... Wiper Blade L8.43 +vat
6x2955425C ... Wiper Blade L8.43 +vat
You need all of the above parts as the wiper blades are actually
different sizes for each side of the car."
...........................................................
Never mind, I just answered my own question. They have LHD versions
availalble:
6x1955409A ... Wiper Arm Drivers 100%
6x1955410A ... Wiper Arm Passenger 50%
6x1955425B ... Wiper Blade Drivers side 100%
6x1955425C ... Wiper Blade passenger side 50%
General consensus seems to be to get 2 driver's side arms, but a driver's
and passenger's blade.
Seamus
...........................................................
Hi all,
you can put some Peugeot 405 wipers on too
http://club.corrado.free.fr/modif/glaces/glace.htm
@+ Sylvain
http://www.clubcorrado.fr.st
----------------------------------------
Fuel, spark, and injectors
----------------------------------------
plugs - W6DP0
using NGK BPR6ES
gap .025
INFO FROM SNS about injectors
The following data is for reference and search in case this question has
been asked.
1. Grey Injectors are 24#
2. Green Injectors are 26#
3. Red top Injectors are 30#.
30# Red top injectors:
Bosch Part #: 0 280 150 945
Ford motorsport part # F1SE-E1A
Junkyard afficiandos: It comes out of :
1992 Ford Thunderbird Sport Coupe 2D V6-3.8L 232cid F/I VIN R Super
(Basically any 3.8L eaton supercharged supercoupe).
blueprinting: http://www.rceng.com/
----------------------------------------
Making the corrado lighter
----------------------------------------
Removable weight options:
* floor sandbag sound deadening (replace with fiber carpet padding)
* Manual seatbelt system
* Remove metal knee bar and replace with Canadian system (sacrifices safety)
* Remove metal bar in doors - G60's have steel bars VR6's have aluminum
bars (severely sacrifices safety - only for a day at the track)
* Replace front seats (Corrado seats are very heavy)
* Stay with your stock 15" wheels (or invest in expensive larger
lightweight wheels)
* Replace stock exhaust system (or at least the suitcase muffler)
* Remove windshield washer fluid container
* Replace ACTIV system
* Remove rear windshield wiper assembly
* Replace aluminum VR6 valve cover with plastic unit
* Replace oil pan with aluminum unit (will crack not bend if hit)
* Remove "damping block" from steering crossmember
...
Every lb. of rotating, unsprung weight you save is the equivalent of
saving 5 lbs. of inert mass. (ratio varies)
----------------------------------------
Detailing tricks
----------------------------------------
black plastic parts... peanut butter!
"skippy smooth" works great
----------------------------------------
Dyno sheets
----------------------------------------
i've got a bbm 1.9L with basically a "stage 3" head. front mount IC from
a starion with custom hard piping, a stage 5-5 SNS chip, 3.5 bar fpr,
ford red top #30 injectors, and a 58 mm pulley.
will post dyno sheet tonight, but here are the numbers:
hp--- 177.9
tq--- 187.5
these are real world, at the wheels, uncorrected numbers. - FastG60
----------------------------------------
Performance numbers
----------------------------------------
G60 (US) SLC (US)
---------------------------------------------------------------
Engine Type PG - 4cyl 8v AA - 6cyl 15deg VR6
Engine Size 1.8L (1781) 2.8L (2792)
0-60mph 7.5s 6.4s (7.8 auto)
0-100kph 8.3s 7.1s (8.1 auto)
Top Speed 138 mph 143 mph
(132 tested)
1/4 mile 16.94 @ 89 mph 15.0 @ 90 mph
Power 158 bhp @ 5600 178 bph @ 5800
Torque 166 ft.lbs @ 4000 173 ft.lbs @ 4200
Bore 81.0 mm 81.0 mm
Stroke 86.4 mm 90.3 mm
Compression 8.0:1 10.0:1
----------------------------------------
Timing belt replacement
----------------------------------------
If you have an impact gun its very simple. I remove the wheel, then the
wheelwell liner. Then I remove the crank pulley(this removes the PS belt
and serp) Then remove the timing belt covers. then align the motor to
TDC. then remove the belt and install the new belt. I like to have some
body hold the tensioner up and the belt on the cam gear as this makes the
alignment of the acessory shaft and crank much easier. I usually put the
engine to 0degrees TDC and then adjust the distributer from there. Make
certain before you install the new belt that the rotor in the distributor
is point to the #1 electrode.
Then buttom everything on up. The belt tensioner tool is helpful but I've
done it with out many times. The tensioner goesup not down.(clearance of
the belt cover)
its a rough over view but I wish somebody gave me those hints when I did
my first job several years ago. -- G60ING
...
Changed my timing belt last night. If I wasn't already doing so much work
in that area of the engine bay already it would have been much more of a
pain in the ass than it already was. Over all things went pretty smoothly
once I got a 12pt 19mm socket to put on the crank so I could get the serp
pulley off. In retrospect I wish I had loosened the hex head bolts before
I took v belt and serp belt off. After that the hardest thing to do was
check and recheck that I had everything lined up properly (very
stressful) I turned the engine by hand a couple of times and didn't hear
any valves colliding with pistons so I think I am all right . Anyway,
good luck if you have any questions email me, but the bentley explains it
pretty well once you connect the words/with the pictures/with what you
are doing-if that makes any sense at all! -- PhantomDubs
...
Cam shaft pulley should have the valley between the 2 dots even with the
space between the valve cover and the head crank shaft notch on the serp
pulley should be at the top and in line with the dot for the
dist./acessory/oil pump shaft.
On my car these dots put me on the money. when playing with a strange
engine I make certain everything is on the money by pulling dist. cap off
and making certain that the rotor is pointing towards the #1 sparkplug
wire which is in the 1oclock position then just for shizt and giggles
pull the #1 spark plug and make certain the piston is all the way up by
useing a screwdriver. Now install the timing belt when you are satisfied
that the marks are all dead on
At this time you should be able to pull the tranny's flywheel inspection
plug and see a notch on the flywheel. take some bright paint or white out
and put a thin line on the mark
You should time the car to 6-8 degrees by useing a timing light with the
blue coolant sensor unplugged and the car warmed up to normal operating
tempature. I like to use a 13mm crowsfoot and a long extension on the
dist. bolt for easy adjustments.
Its a real bear getting those marks dead on center but its so nice when
they are done right. If one tooth is off the car will run but it will be
a dog.
The firing order for the car is 1-3-4-2 -- G60ING
----------------------------------------
Front bumper removal
----------------------------------------
- 4 17mm bolts underneath
- depending on how may were lost, anywhere from 1 - 6 bolts holding the
front spoiler to the core support
- one or two phillips screws holding the brake ducts in on the bumper
and two on each side in the fender wells.
To remove the front bumper first disconnect the fogs/turns as well as
side turns. Push the wires through the bumper. Then look under the
car...you will see 3 bolts on each side...2 larger(~17-19mm) and one
smaller in the middle. Just remove the 2 larger ones from each
side(towards front and rear of the car). Once those 4 bolts are removed
the entire bumper assembly will slide out.
To remove headlights there are 2 screws on top of the headlight holding
it to the core support. Remove those. Also on top of the headlight in the
middle you will see a hole. Use a long phillips head screw driver to
loosen this third screw but you dont need to remove it all the way. Once
that is done you can get the headlights out.
Only four bolts. There is a group of three bolts on the drivers and
passenger side by the radiator. The bolts are in a line going from front
to back. Remove the two outer bolts and leave the center ones in. Once
you have them out, pull on your bumper. The rear is the same way, four
bolts. Very simple. Hope this helps
They should be 17mm bolts, this will help to make sure you take out the
right ones. you can unplug the wiring harness for the turns, side markers
and the fogs on each side should be 6 plugs, one for each light then the
whole thing just comes off, takes like 10 min to get it off
Don't forget to unbolt the 4 or so bolts along the lip spoiler. I did and
bent the ever lovin piss outta the metal part it bolts to.. Grr!!!
----------------------------------------
Control arm bushings
----------------------------------------
audi TT motorsport control arm bushings.. ONLY the rear "pancake"
bushing fits.. dont bother trying to get the fronts in there.. (it is
doable with welding a new sleeve in).. benefits? SOLID hard durometer
rubber.. thicker steel sleeve.. I've been running these on my 92 daily
driver for months.. these put vwms to shame.. side benefit.. they're
cheap! 16.25 each RETAIL.. 8N0 407 181B they work in all mk2's, mk3's
and even the lowly mk4
----------------------------------------
Selling parts
----------------------------------------
ac compressor new - $425 - ebay $50 start?
ac condensor new - $466 - ebay $50 start?
ac short hose new - $288 - ?
----------------------------------------
Polishing lenses
----------------------------------------
I have a 93 SLC, so I have clear plastic front turn signals. After 135K
miles, they were somewhat opaque from road debris.
Materials needed:
600 grit, 800 grit, 1200/1500 grit sandpaper, nu-finish/polishing
compound, razor blade
Using a fresh razor blade, I scraped off the HELLA MADE IN GERMANY and
all other DOT labels, taking care not to gouge too deep into the plastic.
With 1 drop of dish soap and 600 grit sandpaper wrapped around a sponge,
I polished away. Don't worry that they now look worse then when you took
them out of the car.
After evenly sanding with 600 grit, wipe away the pieces of dead bugs and
plastic dust and switch to 800 grit.
Finally, I used 1500 grit sandpaper and another drop of soap/water.
After a few minutes of this, I rinsed and cleaned with a little windex.
A good polish with nu-finish or other (physical not chemical) polishing
compound, and they GLEAM!
http://forums.vwvortex.com/zerothread?id=1300606
----------------------------------------
Rally light fog lens replacement
----------------------------------------
. If
your bulbs are burnt out (like mine were) you can use the bulbs from
these new lights (12V 55W halogen), they fit right into the old lights.
2nd, take the old cracked lens off your fog light assemblies. Be careful,
it is a real pain in the a$$, I had to break off the glass, use pliers
and a screw driver to get all the glass pieces off. Make sure to use
thick gloves for this. Once the glass is off, try to clean off all of the
old white adhesive from the frame, first with a screwdriver and then with
some goo remover.
3rd, take the rally lights apart and use the lens. When you test fit you
will see that it is a very close fit. There is some spalce left on the
sides (about 1/8)

")


No comments have been posted yet...
Want to leave a comment or ask the owner a question?
Sign in or register a new account — it's free