
No, this isn't about how to put the spare on; I hope you can figure that one out on your own! This is an article on the method I use to put new tires on a rim (or change the tube on wire wheels) if you're too cheap to pay someone to do it at the tire shop, or (like me) you just like doing things yourself, or you get a lot of punctured tubes in the middle of nowhere from old worn out wire wheels (also like me).
If you don't want to shell out for a tire machine, you will need a pair of good, long tire irons (spoons). Mine are about 2 ft long, they can be hard to find these days but I got mine from a trucking supply store. There are other labour-saving devices such as mechanical bead breakers available, if you plan on doing this a lot (although they won't fit in the boot). Several alternative methods of breaking beads are described below, and many other creative methods have been devised by shadetree mechanics or in a pinch on the side of the road. When I had wire wheels, the tubes got punctured often (long story) and I got a lot of practice fixing them.

Tire irons (spoons) can be found at trucking and heavy duty supply stores
Be careful not to damage the bead on the tires or they will be ruined. Having a small bucket of soapy water on hand helps a lot, but plain water or even spit will do in a pinch. Do not use screwdrivers instead of spoons, you run a high risk of damaging the tire's bead (or tube where fitted), and they do not give the leverage required.
You can also use a 10 inch carpenter's wooden parallel clamp to break the bead, which can be a lot less work, and takes less room than a dedicated tire machine. Once you get good with spoons though, they are probably the fastest way to get the job done.
It's a good workout; after jacking, removing, changing and remounting 4 wheels you'll probably be sweating buckets!
The "bead" is the circle of rubber where the tire contacts the rim, and creates an airtight seal. Rims have a narrow lip on the inside where the bead sits, sometimes with a slight hump towards the inside so the bead won't fall off the rim if the sidewall gets hit from the side (and which makes mounting and removal a bit more work). Obviously, two beads per tire, one on each side.
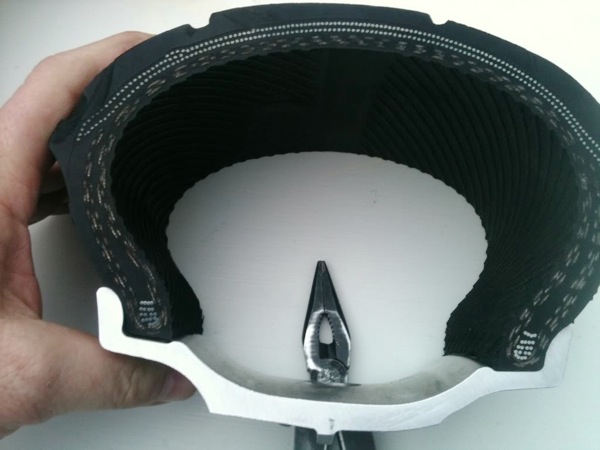
Cross-section showing tire bead seated on rim. This is a motorcycle tire, but the concept is the same.
The procedure I've used is as follows:
- Deflate the tire. Removing the valve from the stem is the fastest way. You can sometimes still find stem caps that have the little slotted valve unscrewing tool on the top, can come in handy.
- Use a spoon to lever the tire towards the CENTER of the wheel, you may need to go around several times and jump on it to "break the bead". The idea here is that you need the opposite side of the bead to be able to tuck down into the lowest part of the rim, so as to give it enough slack to get the near part of the bead up and over the lip of the rim. Alternatively, you can place a bottle or floor jack on one side of the tire, and wedge the other side of the tire against something (a timber to a ceiling joist would work) to break the bead.
- Now, stand on one side of the tire so that it will tuck into the lowest part of the rim, and lever the opposite side up and over the lip. You will need two spoons, leave the first one that you get over in place, and use the second to get more of the tire over the rim. You'll have to start in small increments from the stationary spoon, but after you get half the tire over it will get easier. Proceed until the entire sidewall is on the outside of the rim lip.
- Flip the wheel over and break the other bead as in Step 2.
- Now there is only one bead inside the rim, and the tire will be loose. Put the "tire side" on the ground, and lift the rim so part of the bead is in the lowest part like in #3. Start one spoon in and move the second as in Step 3, and the rim will pop out.
- Stretch your cramped back and enjoy a cold beverage of your choice!
Assembly is, as they say, "reverse of disassembly".

")


the car and not driving it I just keep pumping it back up. Well today I finally sprayed
some soapy water on it & see bubbles coming from the spokes closest to the valve
stem. This article will help me figure it out. Hopefully it's a cut tube I can patch &
reinstall. But this is a great detailed article & honestly not much different from the bicycle
Tire repairs I did as a kid-just bigger tools. I used wooden salad spoons-my Mom never
knew as I cleaned them with comet when I was done.
Want to leave a comment or ask the owner a question?
Sign in or register a new account — it's free